Overview: Case View/Case Table
The Case View/Case Table is where you make changes to your case documents. You can view the documents on the Case View tab in the grid, which lists all of the files. In the Case View, you change the design of the work area and use utilities, such as Tally, to work with the documents in the case. You can also work on individual documents. For example, you might need to edit fields on a document, or open the native file, or rescan the image(s).
For more information on working with the Case View, see the following topics.
- Work at the Case-Level in Case View - This topic covers changes that you make in the Case View grid, including adjusting columns, sorting columns, using the tally function and more. The tasks performed are not changes to an individual document. Rather, they are changes to the workspace itself or the use of tools that have a case-wide impact.
- Work on Records in the Case View/Case Table - This topic covers tasks a user performs on individual documents in the grid. Not the review-specific tasks (such as annotating and tagginng). Rather, the topic focus is on changes to the documents like editing fields, or opening natives.
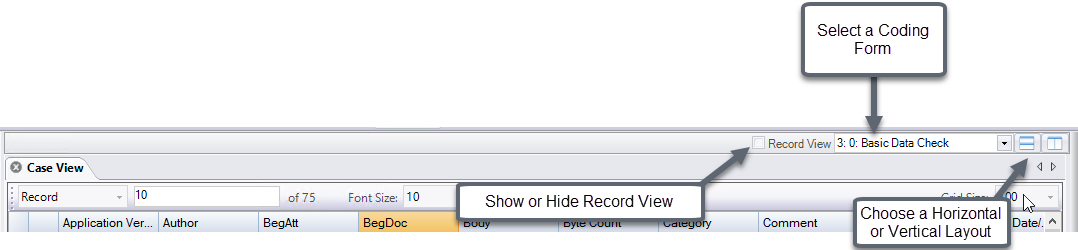
Documents Pane Toolbar
The Documents Pane Toolbar, controls the view of the documents. here you can select a coding form, show/hide Record View, and choose a layout.
Case View or Related Tab Toolbar
The Case View tab has its own toolbar that allows you to specify a document, change the number of rows in the grid, advance from one record to the next, and more.

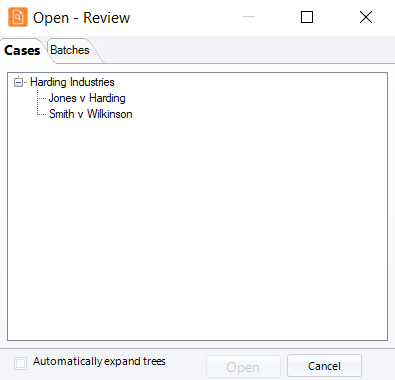
Open a Case in Review
Open a case and access the Case View:
-
On the Dashboard, click the Review module.

-
Select a Client and Case and click Open.
-
To work with a tab in addition to or other than the Case View tab, access the needed tab (Search Results, Private or Public Folder).
-
Optional: Check the default coding form and select a different one if needed. The coding form defines the fields in the case table and Record View (and optionally a sort order), plus other case review options (tags, date range, etc.).
-
Adjust the workspace with any of the following actions:
-
Customize the Desktop layout.
-
Change the font or grid size.
-
Show or hide Record View by selecting/clearing the Record View option. Or make Record View freestanding (undock it).
-
Related Topics
Work on Records in the Case View/Case Table
Work at the Case-Level in Case View
Version: 2023.8.12
Last Revision: 11/8/2023